318 Wolf Hall Audio Visual

Please remember to switch off all the equipment after you are done. Shutdown the computer properly by selecting Shut down from the Windows menu.

Step 1 – Switch on computer

  • Computer model may change, locate the power button on the front of the computer.
318 Wolf Hall Computer

Step 2 – Switch on projector

  • Remember to set the selection to LAPTOP.
318 Wolf Hall Projector

Step 3 – Switch on audio equipment

  • There are two devices to switch on.

Audio 1

318 Wolf Hall Audio 1

Audio 2

318 Wolf Hall Audio 2

BIOSCI Password

The following password instruction is for BIOSCI systems only. If you are looking for information on changing your UDelNet password, please visit UDel Accounts, Access & Password page.

Password Requirements

Your password must be 12-30 characters long, and it must have at least 3 of these:

  • An upper case letter
  • A lower case letter
  • A number
  • A special character (Not a space). Some examples of special characters are > !,@, #, $, %, ? and *

To proceed with the following link to change your BIOSCI password, you must be on the UDel network. Please connect to VPN first if you are not on the UDel network.

Code42 CrashPlan Cloud Backup

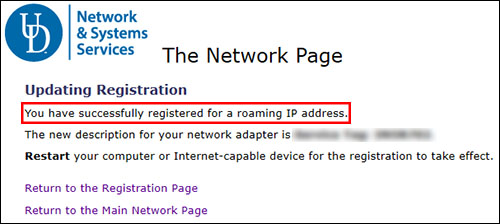
Please contact BISC IT for initial enrollment before using the instructions for Code42 CrashPlan. Follow the strategy below to protect your data. Code42 CrashPlan can help provide you with an offsite copy of your data.

CrashPlan licenses are for use on faculty/staff University-owned machines or faculty/staff machines being used for University business. You can install on up to four devices. Please read the instructions carefully to protect your backup.

Backup Strategy

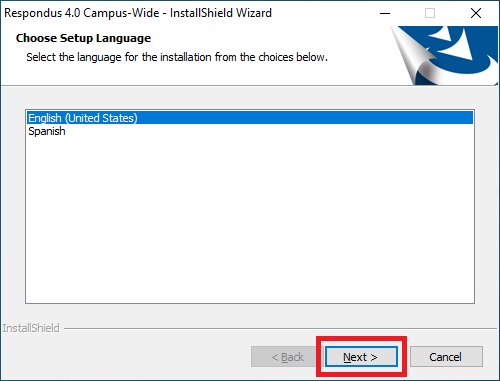
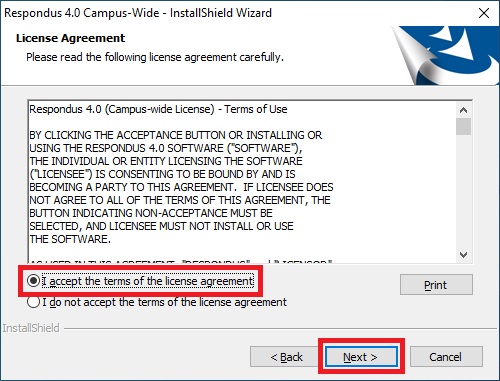
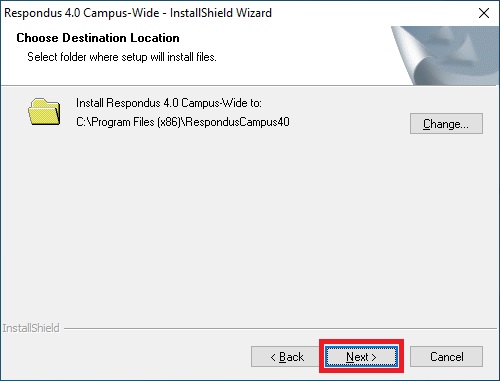
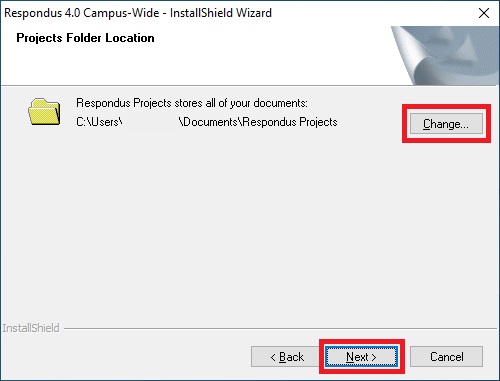
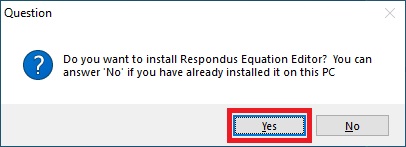
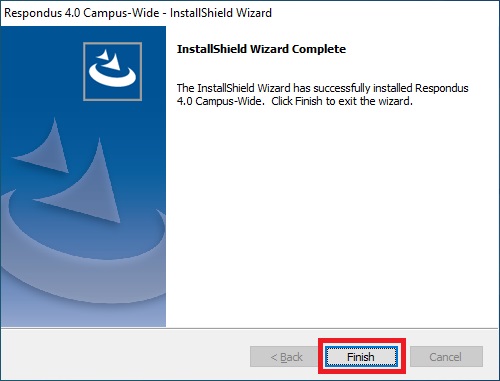
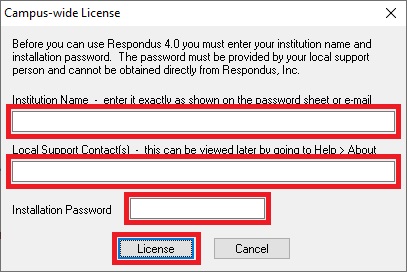
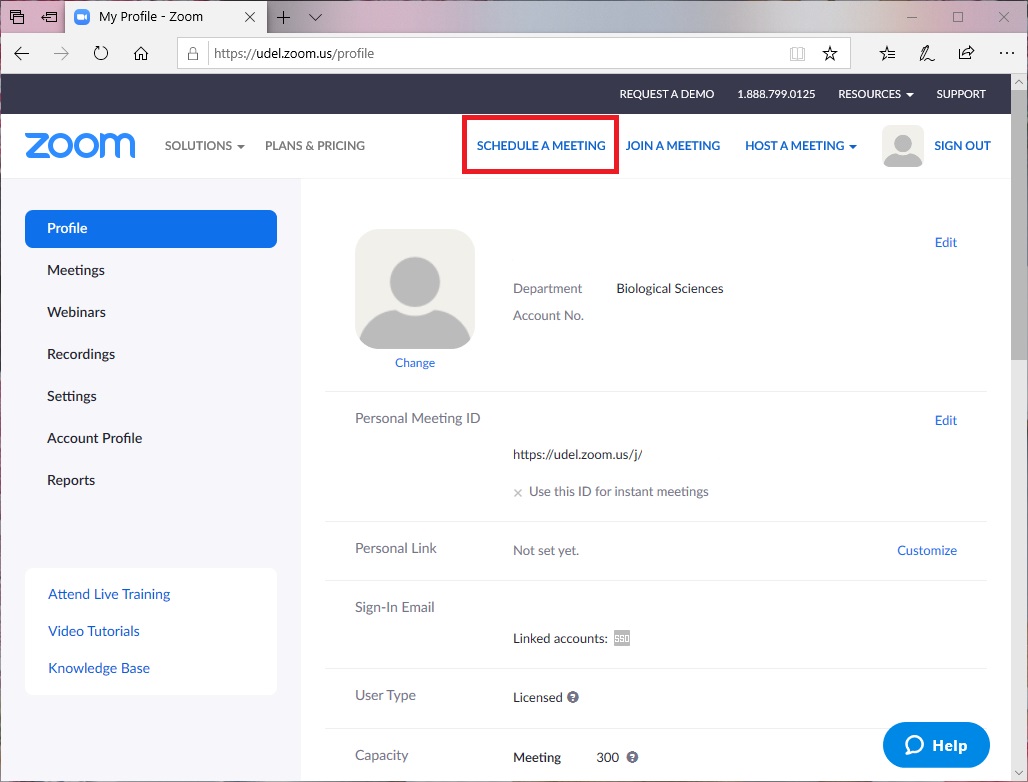
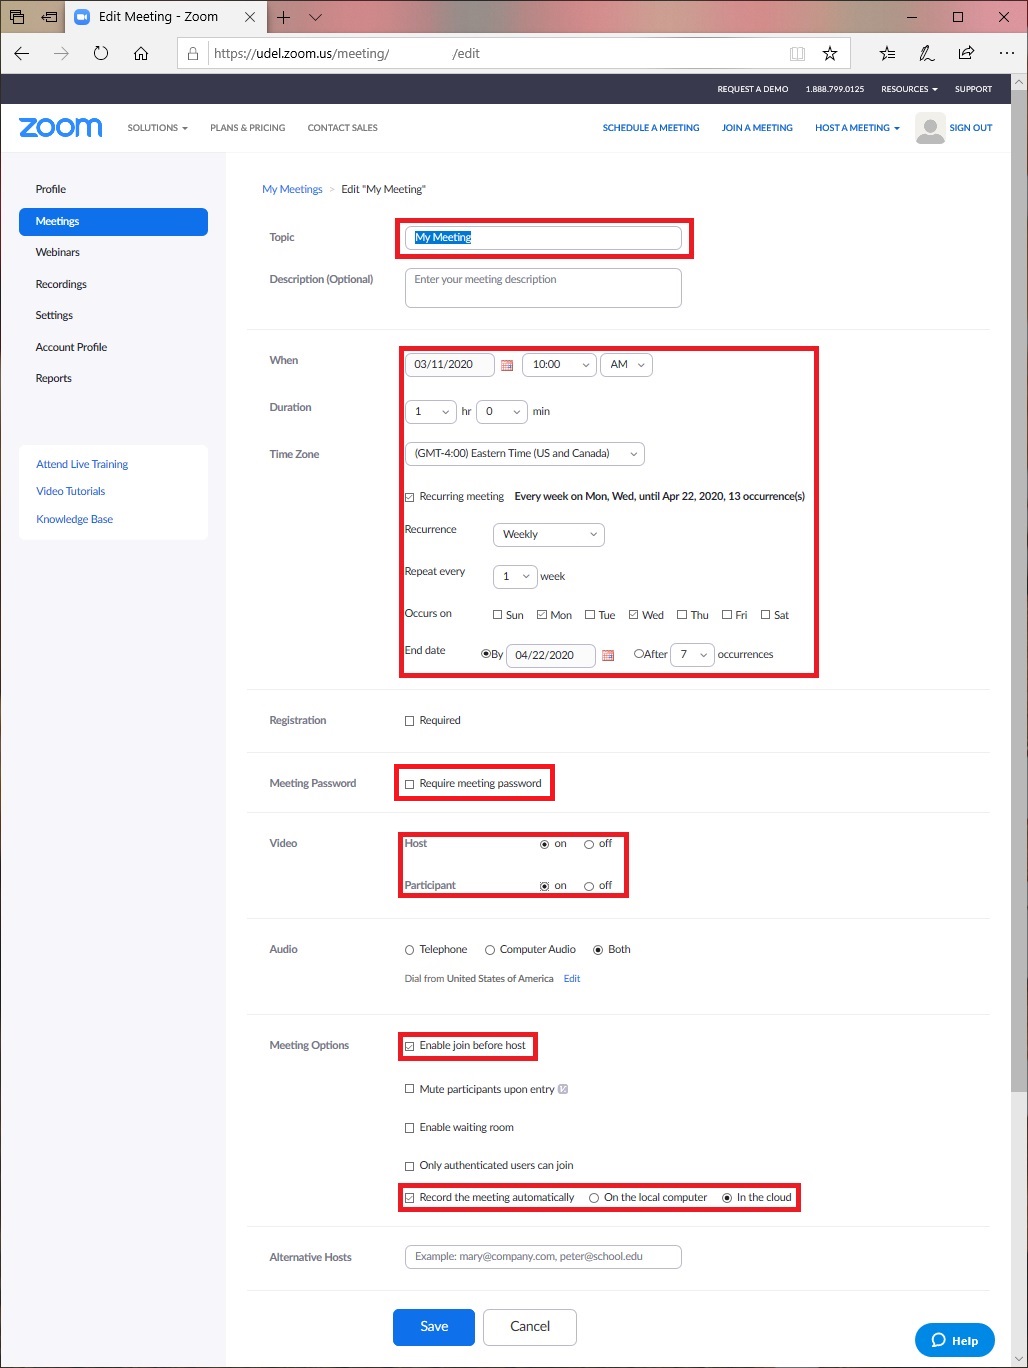
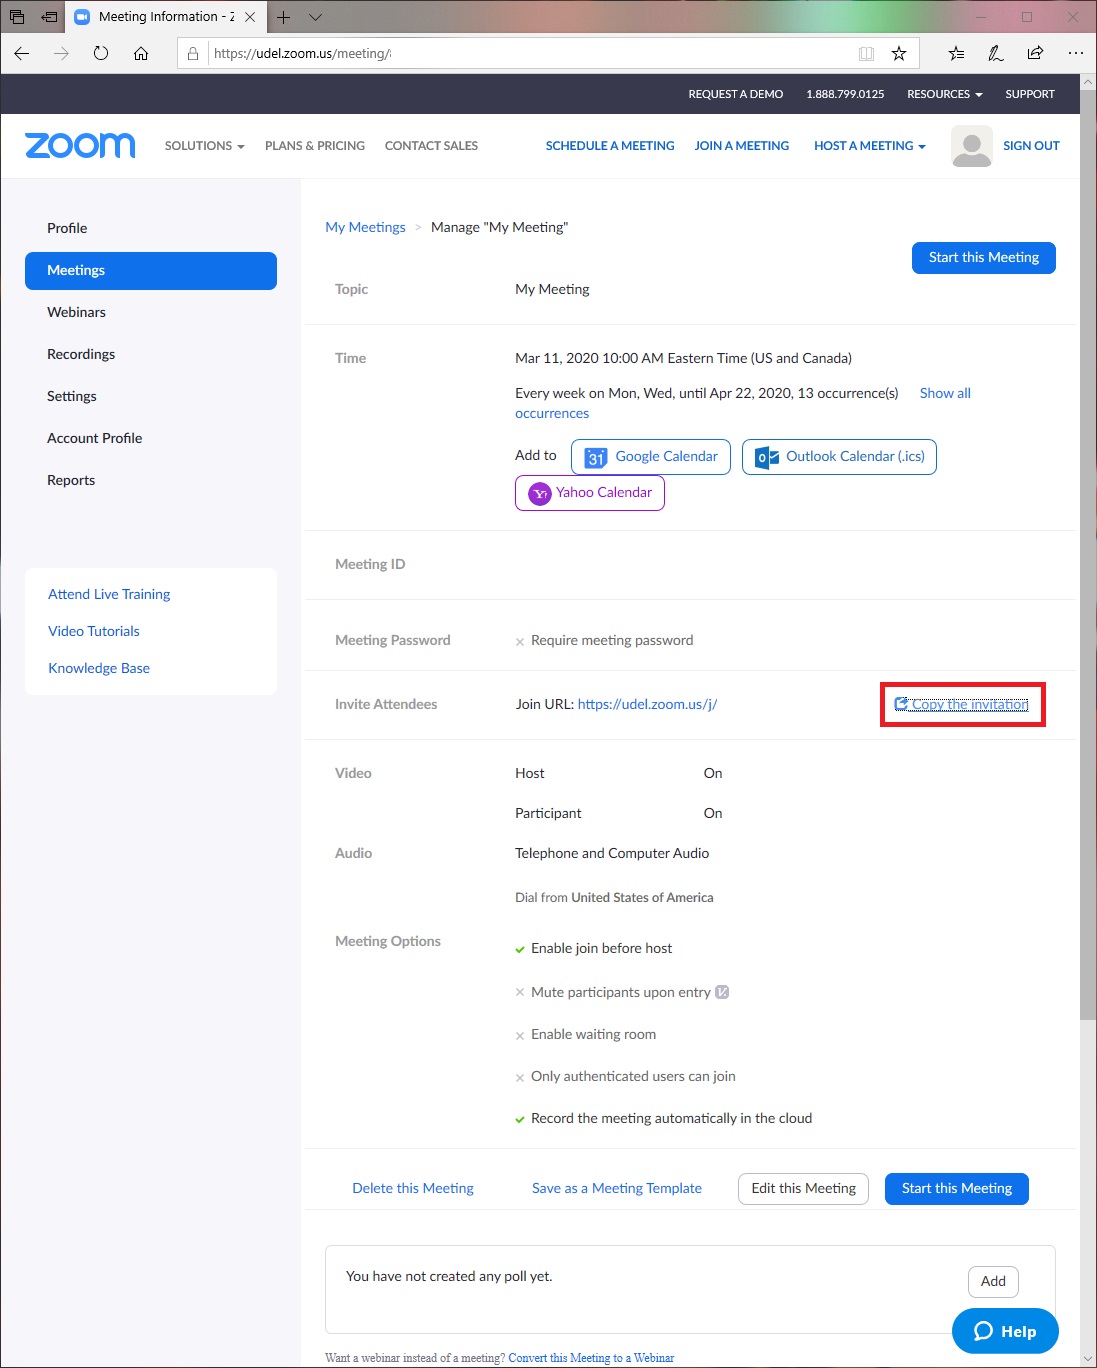
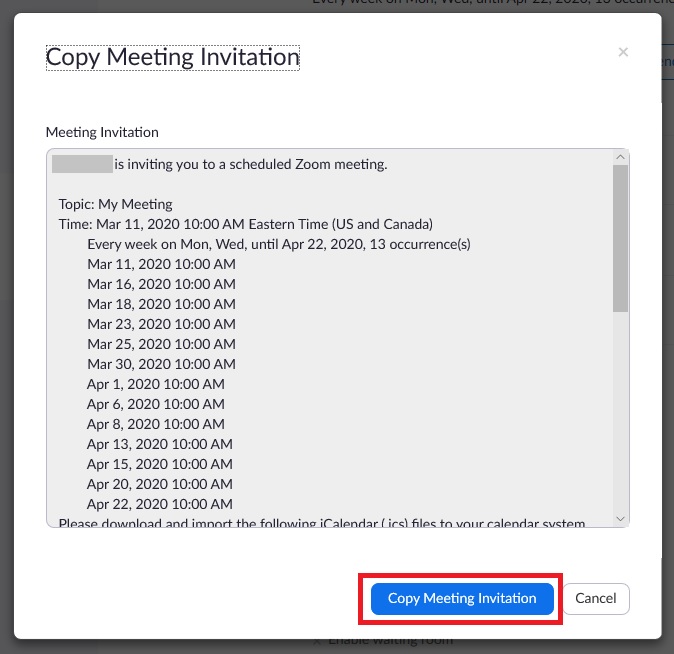
Installation Instructions
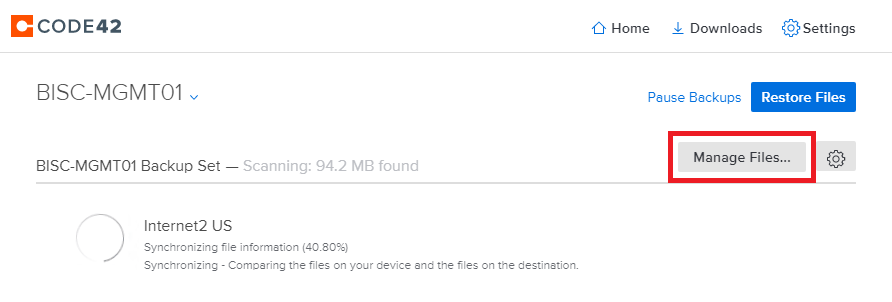
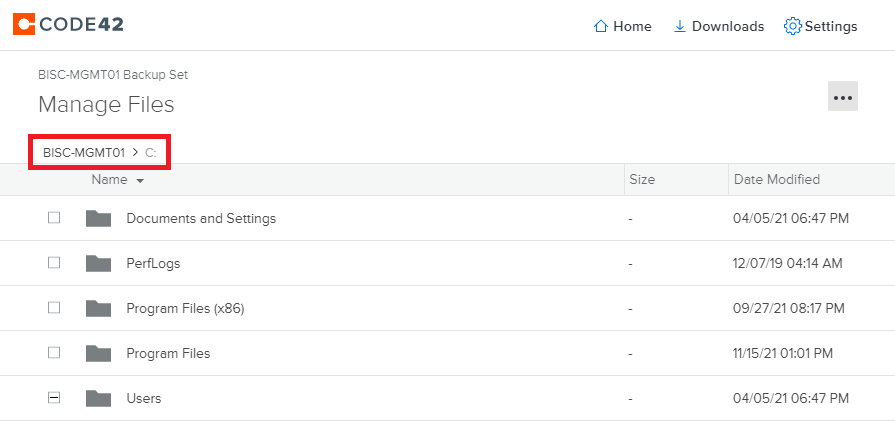
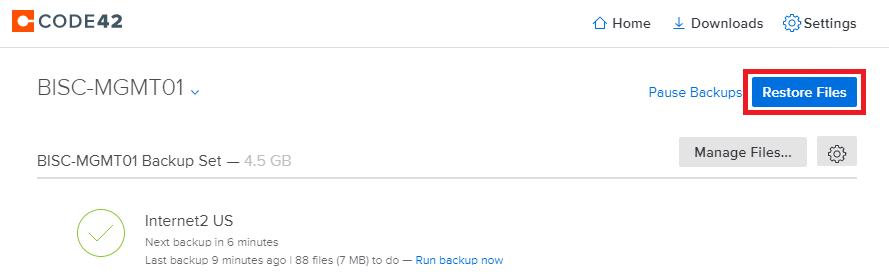
  • IMPORTANT: If this is your lab computer, you must use a separate private administrator account for your installation. If you install using your lab regular sign in, all the backups from different devices on your account will be accessible by everyone using the computer!
  • Sign in to Code42 CrashPlan Console (https://console.us2.crashplan.com) using your UDel email address.
  • You will be redirected to the UDel CAS Login page.
  • In the top left area, move your cursor to the ADMINISTRATION drop down list and click Downloads.
CrashPlan-Downloads-Screen-Capture

  • Download the Mac OS version and start the dmg installation package (typically saved to your Downloads directory).
  • Click on Install Code42 and follow the installation prompts.
    • Select Install for Everybody (all users)
  • Code42 will start automatically after installation. It may take a short period for it to start. If it does not start, please start Code42 from the Applications.
  • Sign in to Code42
    • Username: enter your UDel email address
    • Server Address: clients.us2.crashplan.com
    • You will be redirected to the UDel CAS Login page on a web browser window. After signing in, you can close the web browser tab and go back to the Code42 application.
    • If you have already added a device to backup, you will be prompted to Add New Device or Replace Existing
      • Choose Add New Device on a new device
      • Add as new device: Click Yes
  • Warning prompt (IMPORTANT: MUST COMPLETE STEPS BELOW)
    • Due to Apple privacy restrictions, Code42 cannot back up some files in locations like your Desktop, Documents, and Downloads, and from apps like Contacts, Photos, and Mail until you grant full disk access to Code42.
      • Click Dismiss
    • Open System Preferences > Security & Privacy
    • Click on the Privacy tab
    • Select Full Disk Access on the left pane
    • Click on the lock icon to make changes
    • Check Code42. Code42 should be listed already. If it is not listed, click on the + icon to add it from the macOS Applications
    • Click Quit & Reopen
CrashPlan macOS Full Disk Access Screen Capture
  • CrashPlan will automatically select and backup the files in your user home directory. If you would like to backup other files and directories, click on the Manage Files… button. You can then browse the top level directory by navigating using the path shown. (see the red box in the picture below).
    • WARNING: PROCEED CAREFULLY. If you unchecked your home directory by mistake, your files in your home directory will not be backed up.
    • IMPORTANT: For lab computer installs, check the top level Users directory to backup all the user accounts on the computer.

  • IMPORTANT: If this is your lab computer, you must use a separate private administrator account for your installation. If you install using your lab regular sign in, all the backups from different devices on your account will be accessible by everyone using the computer!
  • Sign in to Code42 CrashPlan Console (https://console.us2.crashplan.com) using your UDel email address.
  • You will be redirected to the UDel CAS Login page.
  • In the top left area, move your cursor to the ADMINISTRATION drop down list and click Downloads.
CrashPlan-Downloads-Screen-Capture

  • Download the Windows (64 bit) version and start the msi installation package (typically saved to your Downloads directory).
  • Follow the installation prompts.
    • Select Install for Everybody (all users)
  • Code42 will automatically start after installation. It may take a short period for it to start. If it does not start, please start Code42 from the Windows Start Menu.
  • Sign in to Code42
    • Username: enter your UDel email address
    • Server Address: clients.us2.crashplan.com
    • You will be redirected to the UDel CAS Login page on a web browser window. After signing in, you can close the web browser tab and go back to the Code42 application.
    • If you have already added a device to backup on a different computer, you will be prompted to Add New Device or Replace Existing
      • Choose Add New Device on a new device
      • Add as new device: Click Yes
  • CrashPlan will automatically select and backup the files in your user home directory. If you would like to backup other files and directories, click on the Manage Files… button. You can then browse the top level directory by navigating using the path shown. (see the red box in the picture below).
    • WARNING: PROCEED CAREFULLY. If you unchecked your home directory by mistake, your files in your home directory will not be backed up.
    • IMPORTANT: For lab computer installs, check the top level Users directory to backup all the user accounts on the computer.
CrashPlan Manage Files Screen Capture 01
CrashPlan Manage Files Screen Capture 02

This set of instructions are for Code42 CrashPlan that have been preinstalled on BISC computers. Follow these steps if you are notified by BISC IT to set up backup for your account.

  • In the lower right corner of your desktop view, click on the up arrow icon near the time and date, and click on the Code42 CrashPlan icon.
BISC Office Code42 Screen Capture Image 1

  • Click Sign in to Code42.
    • Username: enter your UDel email address
    • Server Address: clients.us2.crashplan.com
    • You will be redirected to the UDel CAS Login page on a web browser window. After signing in, you can close the web browser tab and go back to the Code42 application. Be patient if you see a spinning wheel on the Code42 CrashPlan application.
    • If you have already added a device to backup on a different computer, you will be prompted to Add New Device or Replace Existing
      • Choose Add New Device on a new device
      • Add as new device: Click Yes
    • You can close the Code42 app after all the steps are completed.

Restore

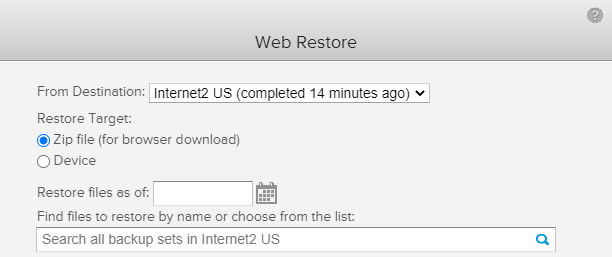
There are different ways to restore files as well as different situations to consider. If you are looking to restore a few small files, you can choose to download a zip file from the web console (currently limited to 250MB). If you are restoring a large number of files, Code42 CrashPlan recommends that you choose to Restore from the App. If your original device has crashed and you are recovering to a new device, please see the following Replace your device instructions on Code42’s website. Contact BISC IT for further assistance.

  • Start the Code42 app.
  • Click on the Restore Files button.
CrashPlan Devices App Restore Screen Capture
  • Proceed to select the date and directories/files to restore. Click Restore Files… in the bottom right area.
  • Restore File options. Choose where to save the restore files and other options.
  • Click Go.
  • Sign in to Code42 CrashPlan Console (https://console.us2.crashplan.com) using your UDel email address.
  • You will be redirected to the UDel CAS Login page.
  • In the top left area, move your cursor to the ADMINISTRATION drop down list and select Devices from the drop down list
  • Click on the appropriate device name.
  • Click on the ‘Restore’ button (see image below)
CrashPlan Devices Web Restore Screen Capture
  • Restore options
    • From Destination: The cloud location should be selected automatically
    • Restore Target options. Choose Zip file or Device.
      • Device will allow you select a specific computer in your backup account to restore the files.
      • Zip file will allow you to download from the web console.
    • Proceed to select the date and directories/files to restore.
CrashPlan Devices Web Restore Selections Screen Capture

Connect to Wireless Network

There are two wireless network available in Wolf Hall. Depending on your location in Wolf Hall, you will see the eduroam and/or BISC Wi-Fi signal. Both connections require sign in with your UDel email address and UDel password.

BISC Wi-Fi Instructions

  • Select the BISC Wi-Fi SSID from the macOS Wi-Fi selection.
    • Username: Enter your full email address
    • Password: Your_UDel_password
macOS Wi-Fi Screen Capture1

  • If your computer is not registered, you will be presented with the registration window. Click on the link Click here to register for Full Internet Access and sign in.
macOS Wi-Fi Screen Capture2
macOS Wi-Fi Screen Capture - Sign In
  • Click on Register the computer or Internet-enabled device you are using right now for full Internet access.
macOS Wi-Fi Screen Capture - Network Registration
  • Type in a description to identify your device (optional).
  • Click Register Roaming IP
macOS Wi-Fi Screen Capture - Description
  • You should see You have successfully registered for a roaming IP address.
  • Restart your computer.
macOS Wi-Fi Screen Capture - Registration Successful
  • Select the BISC Wi-Fi SSID from the Windows Wi-Fi selection.
    • Username: Enter your full email address
    • Password: Your_UDel_password
Windows Wi-Fi Screen Capture - Sign In
  • Continue connecting?
  • Click ‘Connect’
Windows Wi-Fi Screen Capture - Connect

  • If your computer is not registered, you will be presented with the registration window. Click on the link Click here to register for Full Internet Access and sign in.
Windows Wi-Fi Screen Capture - Network Registration
Windows Wi-Fi Screen Capture - Sign In
  • Click on Register the computer or Internet-enabled device you are using right now for full Internet access.
Windows Wi-Fi Screen Capture - Register computer
  • Type in a description to identify your device (optional).
  • Click Register Roaming IP
Windows Wi-Fi Screen Capture - Description
  • You should see You have successfully registered for a roaming IP address.
  • Restart your computer.
Windows Wi-Fi Screen Capture - Success Registration
  • Select the BISC Wi-Fi SSID
  • EAP method: PEAP
  • Phase 2 authentication: MSCHAPV2
  • CA certificate: Select Use system certificates
  • Domain: enter nps01.biosci.udel.edu
  • Identity: enter in your UDel email address
  • Password: enter in your UDel password

Install Respondus 4.0 and Publish Exam to Canvas

Information and Tips

HOWTO get a scantron-based exam uploaded to Canvas with Respondus 4.0 by Dr. David Raden

If you have exams that are written for Scantrons, your exams are probably ready to be uploaded. Here are the 3-steps required to upload questions:

  1. Exam questions needs to be in Word, RTF, or plain text.
    • Remove images and table from the file.
  2. Your questions need to be numbered followed by a period or parenthesis. (example below)
  3. Your answers need to be letters followed by a period or parenthesis. (example below)
    • Change any answers that references other answers to include both. (example below)

That is it! Your exam is ready to import into Respondus and upload to Canvas.

Add your answers to all of the questions at the end of the file. This is not required to get the exam up, but it is easier to add on your computer than once it is in Canvas. After your last question put “Answers:” then add all the answers (question number and correct letter answer) one per line. (example below)

Once it is in Canvas it will need some cleaning up and you need to add tables and figures. See below for a few things that can Improve the process.

Question Example (none of the indentation/spacing/formatting required)

1. First question

A. Answer A
B. Answers B
C. Answer C

2. Second question

A. Answer A
B. Answer B

1) Unformatted question works fine too
A) Answer A
B) Answer B
C) Answer C

Answer Example (again no formatting required) at the end of the file

Answers:
1. A
2. B

Steps to make it go more smoothly. (in order of most useful)

  1. Remove images and table from the file.
    • I had mixed success with importing images and table. It was easier to import them into Canvas separately and attach them to each question.
  2. Change any answers that references other answers
    • “All of the above” to “Sun, Air, and Water”
    • “Both A and B” to “Both transcription and translation”
  3. Add your answers to all of the questions at the end of the file.
    • After your last question put “Answers:” then add all the answers (question number and correct letter answer) one per line.
  4. Add titles to the questions in Canvas. The question numbers do not get imported into Canvas. Canvas automatically numbers your questions. Instead it uses a title for each question. Respondus will automatically add a title based on the first few words of the question.

More Information

Please note that you do not need Respondus if you already have a QTI package that you may have obtained from the publisher of the textbook or other sources. Please see this guide – ‘How do I import a quiz from a QTI package?‘.

Guides from Respondus

Installation

Obtaining Respondus 4.0 package and License

Download custom installation file and license information from UDeploy Respondus.

System Requirements

  • Operating System: Windows 10 or Windows 8
  • Memory: 32 MB RAM minimum
  • Hard Disk Space: 10 MB of free hard disk space for program files
  • Monitor: 1024×768 or 1280×720 minimum resolution
  • Administrator permission required for installation

Installation Steps

Before you start the installation, all other applications must be closed. Do not have Notepad or any text editor open. Run Respondus4Campus.exe to start the installation. The following is a summary of the steps. Informational window screens during the installation are omitted to keep instructions short. Click ‘Next >’ on informational window screens during the installation process.

  • Choose Setup Language: English or Spanish
  • License Agreement: I accept the terms of the license agreement
  • Choose Destination Location: Accept the default path
  • Projects Folder Location: Accept the default path or choose a folder of your preference
  • Do you want to install Respondus Equation Editor? Yes
  • InstallShield Wizard Complete: Finish

Screen Captures of Installation Steps

Respondus 4.0 - Choose Setup Language Screen Capture
Respondus 4.0 - License Agreement Screen Capture
Respondus 4.0 - Choose Destination Location Screen Capture
Respondus 4.0 - Projects Folder Location Screen Capture
Respondus 4.0 - Install Respondus Equation Editor Screen Capture
Respondus 4.0 - Installation Complete Screen Capture

Post Installation

Enter License Information and Choose LMS Personality

Included with the installation file is a text file with the license information. Our license also permits you to install a copy of the Respondus software on a home or travel computer. However, you are not permitted to provide the Respondus software or the password information to anyone who is not affiliated with our institution. Such an action is a violation of our licensing agreement with Respondus and is also illegal. The license information must be entered exactly as shown in the license file.

The first time you start Respondus 4.0, you will be presented with the license window. If you accidentally clicked away or closed the license window, go to the menu at the top of the application and select ‘File‘ and ‘Update License‘.

Copy and paste the information in the correct boxes and click ‘License‘.

Respondus 4.0 - License information windows

After entering the license information, you will need to choose the appropriate learning management system (LMS) personality. Choose ‘Canvas‘.

Respondus 4.0 - Choose LMS Personality window

Publish Exams to Canvas

First Time Publish Set Up

You can create your exams using Respondus 4.0 or import from a Microsoft Word file. When you are ready to publish exams to Canvas, click on the ‘Preview + Publish‘ tab. Please note that the ‘Preview + Publish’ option will only be active after you create or open a saved Respondus exam file or has imported an exam from Microsoft Word or other readable format. Click on ‘Publish‘ in the left pane and click on ‘Publish Wizard‘.

Respondus 4.0 - Preview and Publish Screen Capture

Publish Wizard

  • Type of Publish: Publish to single course. There is also a batch publish to multiple courses.
  • Canvas Server: – add new server –
  • Add New Server Settings: Select No, I want to enter the server settings manually
  • Canvas Server Settings
    • Box 2: https://udel.instructure.com/courses/
    • Box 3: Click Extract >>
    • You should see the following entered in the box after clicking Extract: https://udel.instructure.com/api/respondus/soap
    • Description: UDel Canvas
    • Username: your UD username (without the @udel.edu)
    • Password: your UD password
  • Next

Respondus will display an information box asking you to log into Canvas using the browser window. Simply click ‘OK’.

  • If you have never installed Respondus 4.0 on this computer, you will be prompted to download the Authentication Module.
  • After downloading, a new window will open redirecting you to the UDEL CAS Login page.
  • Click ‘Authorize‘ to allow Respondus access to Canvas.
  • Select assessment type: Choose Graded Quiz (other options available)
  • Specify server action and item name: Choose Create or Replace
  • Click on the area or folder to publish to: If you have multiple courses, select where you would like to publish the exam
  • Proceed and wait until you see the message ‘Publish Completed Successfully

Screen Captures of Publish Set Up Steps

Respondus 4.0 - Publish Wizard Screen Capture
Respondus 4.0 - Add New Server Settings Screen Capture
Respondus 4.0 - Canvas Server Settings Screen Capture
Respondus 4.0 - Log On Screen Capture
Respondus 4.0 - Authentication Module Download Screen Capture
Respondus 4.0 - UDel CAS Screen Capture
Respondus 4.0 - Authorize Screen Capture
Respondus 4.0 - Publish Wizard Screen Capture
Respondus 4.0 - Choose area or folder Screen Capture
Respondus 4.0 - Publish Completed Screen Capture

Schedule a Zoom meeting

Go to Zoom

Full link: https://udel.zoom.us

Sign in

Zoom Sign In Screen
UD CAS Sign In Screen

Schedule a Meeting

Zoom Schedule Meeting Screen

Meeting Settings

We recommend the following settings below:

  • Enter a meeting name in the Topic field.
  • Set Date/Time.
    • Set Recurring meeting as needed.
  • Check ‘Require meeting password
  • Check ‘On’ for Video for both ‘Host’ and ‘Participant’.
  • Check ‘Enable join before host’
  • Check ‘Record the meeting automatically’ and ‘In the cloud’ as needed.
  • Click ‘Save’
Zoom Meeting Settings Screen

Get Meeting Invitation

Click on ‘Copy the invitation’.

Zoom Invitation Screen

Copy and Send Invitation

Click on the ‘Copy Meeting Invitation’ button.
Use your preferred method of communication with your students/participants to send the meeting invitation.
This can be done via email or Canvas communication.

Zoom Copy Meeting Invitation Screen

Start Meeting

When it is time for your meeting, sign back in to Zoom and click on ‘Meetings’ and then ‘Start’. It is important that you sign in again when it is time to start the meeting so you have all the features as host of the meeting.

Zoom Start Meeting Screen

Test Zoom Meeting

Test Zoom for Computers

Go to Zoom Test (Computers)

Link: https://zoom.us/test

Join Zoom Test (Computers)

If Zoom did not start automatically, click ‘download & run Zoom‘. Your browser may save it to a location that is set for the browser so please check the location for the file.

Enter your name. Click ‘Join Meeting‘ and then ‘Join with Video‘.

Zoom Test Screen 03

If your camera is on, you should see what the camera is capturing.

Test Camera, Speaker and Microphone

The test will automatically start. If you have multiple devices with speaker or microphone connected to your computer, please click on the drop down list as shown in the screen captures below to select your preferred camera, speaker and microphone.

Zoom Test Speaker
Zoom Test Speaker
Zoom Test Success

Test Zoom for Mobile Devices

Go to Zoom Test

Link: https://zoom.us/test

Click View and install the Zoom app if you do not have it on your mobile device. After installing the app, go back to the link above in your web browser and click ‘Join

Join Zoom Test

Open this page in “Zoom”? – Click ‘Open‘.
Please enter your name: Enter your name here.
“Zoom” Would Like to Access the Camera – Click ‘OK‘.
Video Preview – Click ‘Join with Video‘.
“Zoom” Would Like to Access the Microphone – Click ‘OK‘.
“Zoom” Would Like to Send you Notifications – Decide if you would like the notifications.

Example screen captures – left to right.

Zoom Mobile Test Open App
Zoom Mobile Test Enter Name
Zoom Mobile Test Access Camera
Zoom Mobile Test Join Video
Zoom Mobile Test Access Micrrophone
Zoom Mobile Test Send Notification
Zoom Mobile Test Call using Internet Audio

Get Familiar with Zoom

Check that your speaker is ON.
During class you should mute your microphone or your instructor may mute it for you. Be sure to enable the microphone if you need to speak.

Zoom Test Mobile Get Familiar

Use Zoom – Quick Check and Run Through

Quick Check

We recommend that you check the following to minimize issues with using Zoom. We also recommend that you ask your students to test Zoom before the class. See Zoom test instructions.

Make sure you sign in to start your scheduled meeting so you are the host
Check microphone and speaker
Check camera
Decide how to manage participants
Keep Zoom chat window open

Check Microphone and Speaker

Check that you are not muted. The mic icon will have a red line if muted. Hit the up arrow key to choose your preferred microphone and speaker especially if you have multiple devices connected that function as microphone/speaker.

Use Zoom Check Mic and Speaker

Check Camera

If you see a black screen, make sure nothing is covering your camera. Some webcams may have a privacy cover. Hit the up arrow key to choose your camera if you have multiple cameras connected like an integrated laptop webcam and an external USB webcam.

Use Zoom Check Camera

Decide how to manage participants

For classes with a large number of students, you may want to ‘Mute Participants on Entry’ and uncheck ‘Allow Participants to Unmute Themselves’. If you do this, please pay attention to the Zoom Chat and the Participants windows should a student ask a question or try to get your attention. Know how to change the settings so you can prevent disruption and allow interaction as needed.

Decide how to manage participants

Image Block

Chat Window

Keep the chat window open if you mute participants so they can ask their questions via chat.

Use Zoom Chat Window

Using Zoom

Share Screen

There are many different sharing options. Most basic will be sharing your PowerPoint, the whole screen or a Whiteboard. Explore the ‘Advanced’ tab should you need other sharing options. Decide on how you would like to manage sharing and know how to change the settings during your session. Please see Zoom’s Sharing your screen webpage for more information.

Use Zoom Share Screen

Example: Share PowerPoint presentation

Advanced Sharing Options

Use Zoom Advanced Sharing

Breakout Rooms

You can use this feature to hold sub groups discussions. Please be aware that if you are recording, only the main room will be recorded. Please see Zoom’s Getting Started with Breakout Rooms for more information.

Use Zoom Breakout Rooms

Record

If you would like to record your meeting but did not set to record automatically when the meeting starts, you can click on the ‘Record’ button and select ‘Record to the Cloud‘.

Use Zoom Record